Please Note: This article is written for users of the following Microsoft Excel versions: 97, 2000, 2002, and 2003. If you are using a later version (Excel 2007 or later), this tip may not work for you. For a version of this tip written specifically for later versions of Excel, click here: Creating a Sort Order.
Written by Allen Wyatt (last updated September 21, 2022)
This tip applies to Excel 97, 2000, 2002, and 2003
There are times when a normal sorting order just doesn't cut it. Instead, you need a special sorting order that fits the type of data you are working with. In the previous tip you learned that you can instruct Excel to sort by a special sorting order, such as days of the week. You can also easily create your own sorting orders.
For instance, let's assume you have a field that can contain the name of one of four colors—Black, Red, Green, and Orange—and that you wanted your list sorted in that order. The problem is, Excel would normally sort this list alphabetically—Black, Green, Orange, and Red. The solution is to create a custom list that has the color names in the order you desire.
To create a custom list, follow these steps:
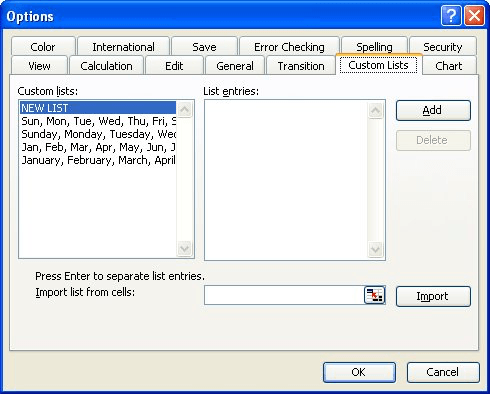
Figure 1. The Custom Lists tab of the Options dialog box.
In step 4 you need to enter information in the List Entries area of the dialog box. For this example you would type the following:
Black
Red
Green
Orange
Make sure you press Enter at the end of each element and that what you type matches exactly the possible contents of the sorting field. Once your lists are defined, you can use them to sort as described in other ExcelTips.
ExcelTips is your source for cost-effective Microsoft Excel training. This tip (2920) applies to Microsoft Excel 97, 2000, 2002, and 2003. You can find a version of this tip for the ribbon interface of Excel (Excel 2007 and later) here: Creating a Sort Order.
Save Time and Supercharge Excel! Automate virtually any routine task and save yourself hours, days, maybe even weeks. Then, learn how to make Excel do things you thought were simply impossible! Mastering advanced Excel macros has never been easier. Check out Excel 2010 VBA and Macros today!
Sort your data and you may be surprised at what Excel does to your formatting. (Some formatting may be moved in the sort ...
Discover MoreInformation in a cell can be entered using line feeds, which results in multiple lines of data in the same cell. If you ...
Discover MoreIf you need to know how a range of data is sorted, the task is not as easy as you might at first think. This tip examines ...
Discover MoreFREE SERVICE: Get tips like this every week in ExcelTips, a free productivity newsletter. Enter your address and click "Subscribe."
There are currently no comments for this tip. (Be the first to leave your comment—just use the simple form above!)
Got a version of Excel that uses the menu interface (Excel 97, Excel 2000, Excel 2002, or Excel 2003)? This site is for you! If you use a later version of Excel, visit our ExcelTips site focusing on the ribbon interface.
FREE SERVICE: Get tips like this every week in ExcelTips, a free productivity newsletter. Enter your address and click "Subscribe."
Copyright © 2024 Sharon Parq Associates, Inc.
 Please Note:
This article is written for users of the following Microsoft Excel versions: 97, 2000, 2002, and 2003. If you are using a later version (Excel 2007 or later), this tip may not work for you. For a version of this tip written specifically for later versions of Excel, click here:
Please Note:
This article is written for users of the following Microsoft Excel versions: 97, 2000, 2002, and 2003. If you are using a later version (Excel 2007 or later), this tip may not work for you. For a version of this tip written specifically for later versions of Excel, click here:
Comments